Providing Wireless Irrigation Control Systems and Lighting Management Solutions for Landscape and Athletic Field Irrigation in Cities, HOA and School Districts.
Benefits
- Significantly reduce water consumption
- Save Energy - electricity, fuel and manpower
- Full featured DC Controllers requiring no electrical service
- Make system changes in minutes from anywhere
- Total control of field lights
- Optional ET driven with i-ET software
- Manual operation of valves with
i-Remote (BlackBerry and Android apps)
- Real-Time Flow Monitoring
- High Flows - broken laterals or valve failures
- Low Flows - clogged nozles or valve failures
- Water Leaks - unscheduled water usage
- Water Bursts - broken mainlines valve stuck open
- Comprehensive Management Reports (daily, monthly and yearly) of:
- Water Usage
- Weather Conditions
- Power Consumption
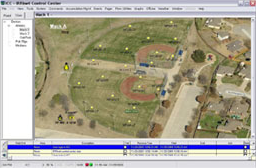
ICC
ICC / IRRInet Control Center, by Motorola, is the powerful base station and central software that provides a system operator the ability to manage/control irrigation and other resources utilizing the IRRInet family of controllers.
More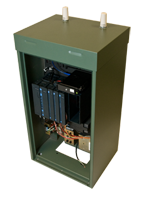
CONTROLLERS
Motorola's wireless communications expertise provides access to field units via Two-Way Radio, IP, Cellular Modem and built in Store and Forward features. These communication methods provide a reliable, cost effective, high speed and efficient method of implementing an irrigation central control system across any type of geogaphic area.
More
FLOW METERS
The ARAD Hydrometer brings together two components into a single unit; a water meter and an electrically activated double-chambered irrigation valve. This unit is typically used as a combination Flow Meter and Master Valve when installed as a component of the (ICC) IRRInet Central Control system.
More